

RDL-320 Tv Signal Tester Transmission System Energy Efficiency And Display Performance Test
Product Details:
| Place of Origin: | China |
| Brand Name: | KingPo |
| Certification: | Calibration Certificate |
Payment & Shipping Terms:
| Minimum Order Quantity: | 1 |
|---|---|
| Price: | To be quoted |
| Packaging Details: | safety carton pack or plywood box |
| Payment Terms: | T/T |
- Description
- Reviews (0)
Description
Detail Information
tv test equipment
,
tv signal tester
Product Description
RDL-320 Tv Signal Tester Transmission System Energy Efficiency And Display Performance Test
RDL-320 TV Signal Transmission System
1 Overview
1.1 Product Introduction
The product is used for digital TV testing and provides test signals for TV test experiments. The product can generate test signals CVBS, YPbPr, SDI, HDMI, and RF antenna interfaces to meet the test requirements of the main TV interface.
1.2 Application areas:
1. TV energy efficiency test;
2. TV display performance test;
3. TV test of other items;
1.3 Features:
1.3.1 Video baseband signal:
(1) Includes four interface types: CVBS, YPbPr, SDI, and HDMI;
(2) Support PAL and NTSC standard-definition video formats;
(3) Supports 1920×1080 50i, 1920×1080 50p, 1920×1080 60i,1920×1080 60p,etc
(4) Supports the ultra-high definition (4K) video formats of 3840×2160 25p, 3840×2160 30p, 3840×2160 50p, 3840×2160 60p;
1.3.2 Analog TV modulation signal:
(1) TV standard: PAL-DK;
(2) Output impedance: 75 ohms;
(3) Frequency range: (47~862) MHz;
(4) Level range: Main output: (100 ~ 120)dBμV,
Sub output: (70~90)dBμV.
1.3.3 Digital TV Modulation Signals:
(1) TV standards: DTMB, DVB-C, DVB-T, etc.;
(2) Output impedance: 50 ohms;
(3) Frequency range: (32~2196) MHz;
(4) Level range: (-60~0)dBm;
(5) Modulation error ratio: >36dB.
2 Front panel instructions
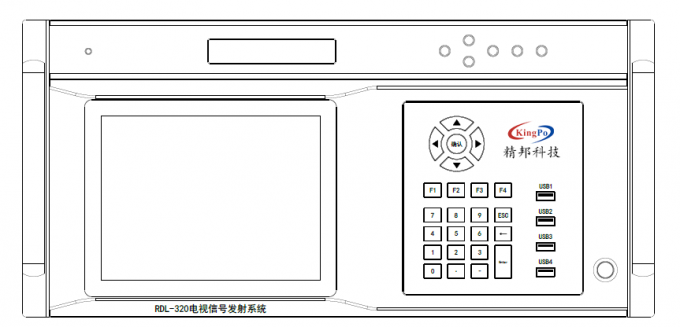
1 Analog TV Modulation Module Display
Display parameter information such as frequency and level of analog television modulation signal
2 Analog TV Modulation Module Control Buttons
It is composed of up, down, left, right, ENTER and EXIT. It is used with analog TV modulation module display screen to set the parameters such as frequency and level of analog TV modulation signal.
3 System display
Display system control software interface with touch screen function, used to set system signal selection, video format and digital TV modulation signal parameter settings.
4 Thin film button
It is composed of navigation keys (up, down, left, right, etc.), numeric keypad, and function keys to facilitate the user to operate the control software.
5 logo
Territor Instruments logo
6 USB interface
It is convenient for users to connect external devices such as mouse, keyboard, and USB flash drive.
7 Power key
Control system switch.
3 Rear panel instructions
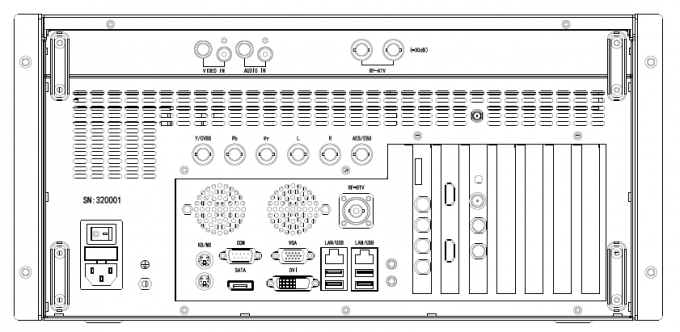
1Video in and Audio in interfaces
The video input and audio input interfaces of the analog television modulation module, are respectively connected to the Video in interface to the Y/CVBS interface and Audio in to the L or R interface.
2RF-ATV
Analog TV RF modulated signal output interface with right side interface with 30dB attenuation.
3Y/CVBS, Pb, Pr interface
Analog TV composite signal and color difference component signal output interface, in which the Y/CVBS interface outputs a composite signal (CVBS) when the signal format is PAL and NTSC, and outputs a luminance signal (Y) in the color difference signal under other formats.
4L, R, AES/EBU interfaces
Audio output interface, where L and R are analog audio output interfaces, and AES/EBU is a digital audio output interface.
5SDI interface and HDMI interface
Digital video signal output interface.
6RF-DTV interface
Digital TV RF modulated signal output interface.
7System Peripheral Interface
It is convenient for users to connect external devices such as monitors, mouse, keyboards, and USB flash drives.
8System power interface and switch
Connect and control system power.
3 Technical indicators
| Interface type | Project | Range | Indicator |
| CVBS | Brightness level | (0~700)mV | ±(2%X+6mV) |
| Chromaticity level | (0~885.1)mV | ±3% | |
| Chroma phase | (0~360)° | ±1° | |
| YPbPr | Brightness signal output level (Y) | (0~700)mV | ±(2%X+6mV) |
| Color difference signal output level (Pb, Pr) | (-350~350)mV | ±(2%X+6mV) | |
| RF-ATV | Level |
(100 ~120)dBμV (70~90)dBμV |
±3dB |
| frequency | (47~862)MHz | 0.001% | |
| Differential gain | —— | <3% | |
| Differential phase | —— | <3° | |
| K factor | —— | <3% | |
| Luminance nonlinearity | —— | <3% | |
| Luminance noise | —— | <-46dB | |
| RF-DTV | Level | (-60~0)dBm | ±2dB |
| frequency | (32~2196)MHz | 0.0001% | |
| Modulation error ratio | —— | >36dB |
TV energy efficiency test
1. Connect the "Y/CVBS" connector on the rear panel of the RDL-320 to "Vdieo in", "L" or "R" to "Audio in", and the right side of the "RF-ATV" analog TV RF connector. The interface with "-30dB" is connected to the antenna input interface of the TV under test with a BNC cable and an adapter;
2. Open the desktop shortcut "TIRT" , the interface is shown in figure 1, in the "signal list" choose "SD_ static. MPG", "video formats" choose PAL, then click the "play" button, the broadcast signal, according to the standard adjustment eight gray-scale of the television, and test the static power;
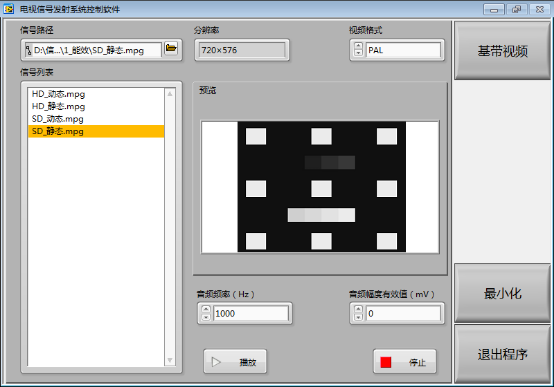
Figure 1
3. After the static standby power test is completed, click the "Stop" button to stop playing the signal, switch the signal to "SD_dynamic.mpg", and test the dynamic power;
4. Connect the "RF-DTV" interface on the rear panel of the RDL-320 to the antenna input interface of the TV under test using the BNC cable and adapter;
5. Open the desktop shortcut "StreamXpress" , the interface is shown in Figure 2. Click "RF Output Control" in the "Settings" menu to enter the output level setting interface. As shown in Figure 3, set the output level to -60dBm and set the modulation parameters according to Figure 2 , the signal to be measured select D: signal TS energy efficiency HD static. ts, click, "play" button, test the static power, test signal is switched to HD dynamic. ts, and play, test Dynamic power.
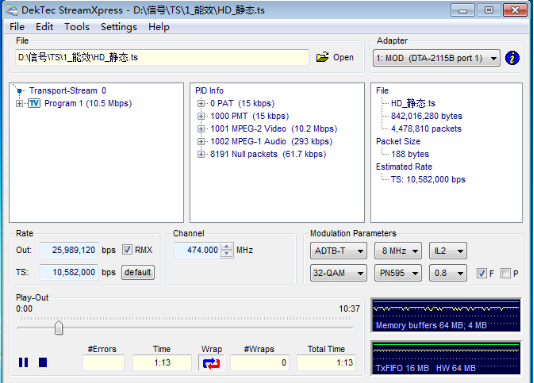
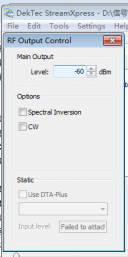
Figure 3
6. The test of the set-top box is similar to the digital part of the TV. The "RF-DTV" interface on the back panel of the RDL-320 is connected to the antenna input interface of the set-top box under test using a BNC cable and an adapter.Select the corresponding digital TV input format according to the set-top box format. If it is a DVB-C standard set-top box, set the modulation parameter in “StreamXpress” to DVB-C, 64QAM,
Set "Sym" to "6875000", as shown in Figure 4. If the set-top box is a DTMB standard set-top box, set the modulation parameters according to Figure 2.
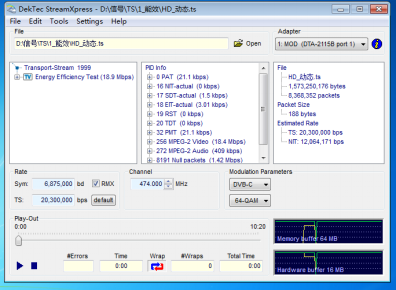
Figure 4
Monitor energy efficiency test
1. Connect the VGA, DVI, and DP ports of the RDL-320 rear panel to the corresponding input of the monitor as shown in Figure 1. If the monitor is an HDMI port, use a DP-HDMI adapter to convert to a HDMI cable,the connect with monitor.
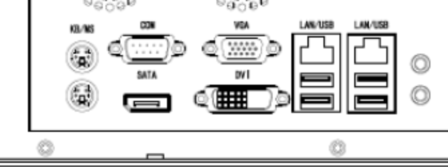
Figure 1
2. Right-click on the desktop and select "Screen Resolution (C)" from the drop-down menu, as shown in Figure 2;
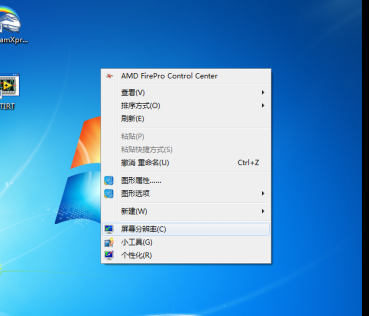
Figure 2
3 in the "multi-monitor (M)" menu, select "Copy desktop on 1 and 2," as shown in Figure 3
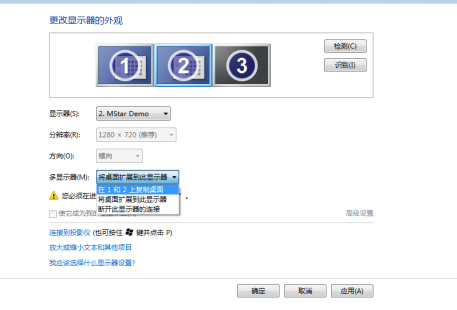
Figure 3
4. In the "multi-monitor (M)" menu, select "display only on the desktop 2", as shown in Figure 4, click "OK", and in the pop-up dialog box, click "keep changes", then RDL-320 host display The screen turns black and the system desktop is displayed on the monitor under test;
Then right-click on the desktop, select "Screen Resolution (C)" in the drop-down menu and select the desired resolution in the "Resolution Menu". Finally, click OK, and click "Keep Changes" in the pop-up dialog box.
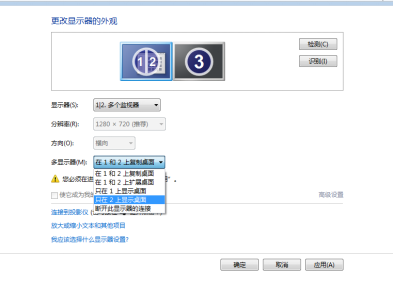
Figure 4
5. Enter the "Computer Monitor Test Signal" folder in the D drive directory (if the monitor is a widescreen (16:9 or 16:10), select a 1920×1080 resolution test pattern. If it is 4:3, select 1024. ×768 resolution test chart), open the picture that needs to be played, and click "Play slide (F11)", as shown in Figure 5;
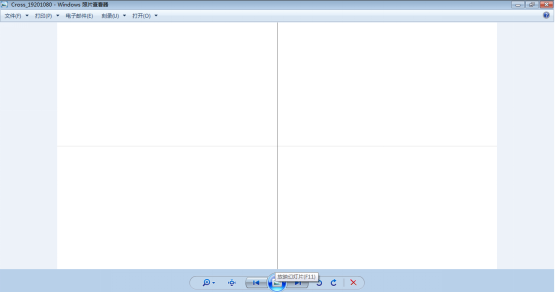
6. Right-click on the full-screen playback picture, select "Pause" in the drop-down menu, as shown in Figure 6, start the test.
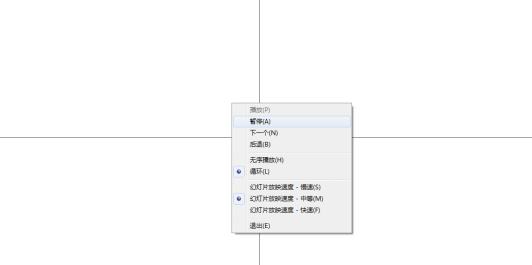
Figure 6


Reviews
There are no reviews yet.