

Two-dimensional CCD + TUBE Image Measuring Machine Auto Gantry Type
Product Details:
| Place of Origin: | China |
| Brand Name: | KingPo |
| Certification: | Calibration Certificate |
Payment & Shipping Terms:
| Minimum Order Quantity: | 1 |
|---|---|
| Price: | To be quoted |
| Packaging Details: | safety carton pack or plywood box |
| Delivery Time: | 40 working days |
| Payment Terms: | T/T |
| Supply Ability: | 5 sets per month |
- Description
- Reviews (0)
Description
Detail Information
coordinate measuring machine
,
metallographic machine
Product Description
High-precision Auto Gantry Type Two-dimensional Image Measuring Instrument
|
Item |
Explain |
Description |
Specifications |
QTY |
Note |
| 1 |
Host system
|
main structure | Granite base | 1 | |
| transfer method | Rails with table rails | 1 | |||
| 2 |
Image system |
CCD+TUBE |
US TEO High-Definition Color CCD Manual 0.7-4.5 zoom lens |
1 | Dual image window with image navigation |
| Surface + bottom light |
Surface LED adjustable white light + bottom adjustable light |
1 | |||
| 3 | Software system |
AVM2.5D Two-dimensional measurement software |
Data transfer box + password lock + Installation CD + Operating Instructions |
1 | |
| 4 | Special computer | Host +21'' LCD |
INTEL Dual Core+4GB Memory+500G HDD+21” LCD Monitor |
1 |
Machine features:
● Provides manual and 3-axis joystick control. After the workpiece is programmed, it can automatically perform measurements and automatically export the report.
● CNC programming can be done in array mode to improve programming efficiency.
● The lens can automatically change the magnification and auto focus according to CNC programming. (Optional)
● LED light source can automatically convert brightness according to CNC programming to avoid measurement errors due to light changes.
● Measurement results can be set to upper and lower limits, OK or NG will be displayed in green or red.
● Comes with SPC to provide CPK value for reference.
● Can connect the whole picture of shooting artifacts
● The image is automatically searched for edges to avoid visual errors. The height can be measured through the probe (optional).
● Workpiece measurement graphics, graphics and images can be archived and transferred to DXF file for CAD editing.
● Automatically generate WORD/EXCEL report and customize report format, automatically import measurement results.
● Measurement data can be automatically imported into customer-made forms.
● Provides geometric dimension measurement, tolerance calculation and graphic
●display of various kinds of precision parts. Measurement data can be archived and exhaled at any time.
● Super deburring function, quick removal of images with burrs or blemishes, and correct acquisition of measurement data.
● Provides image edge finding tools. Points, lines, boxes, circles, and arcs can be quickly searched for edges.
● Chinese and English operating environment
TECHNICAL PARAMETERS :
Model:
WH-7060-CNC
operating stroke X: 600mm,Y: 700mm
external dimension 1500x1600mmx1800mm(X x Y)
Weight 1800Kg
WH-8070-CNC
operating stroke X: 700mm,Y: 800mm
external dimension 1500x2000mmx1950mm(X x Y)
Weight 2100Kg
WH-1080-CNC
operating stroke X: 800mm,Y: 1000mm
external dimension 1600x2100mmx2000mm(X x Y)
Weight 2500Kg
WH-1210-CNC
operating stroke X: 1000mm,Y: 1200mm
external dimension 1750x2350mmx2000mm(X x Y)
Weight 3800Kg
WH-1612-CNC
operating stroke X: 1200mm,Y: 1600mm
external dimension 2050x2800mmx2000mm(X x Y)
Weight 5000Kg
WH-2018-CNC
operating stroke X: 1800mm,Y: 2000mm
external dimension 2800x2950mmx2000mm(X x Y)
Weight 6500Kg
Specifications:
1. Machine precision: 4+L/250mm.
2. Three-axis optical ruler resolution reading: 0.001mm.
3. Height of workpiece: 200mm.
4. The plate is painted with powder coating.
5. Zoom Lens(multiplier): about 30-230x (about 5.3~0.8mm in the object's field of view)(the larger the multiplier, the smaller the object's field of view)
6. 1 times eyepiece.
7. Flat glass, correction glass each piece.
8. Workload: the maximum load of the test piece is 30kg.
9. Power supply: 220V /15A.
10. The operating temperature of 20 ℃ + 2 ℃ and humidity: 40% ~ 65%
11. One special bracket for measuring instrument.
Measurement software features:
A:1. Software operating system: WIN 7 / WIN XP.
2. Multi-point measurement fitting function.
3. Measurement in order to reverse the course.
4 basic measurements: point / line / Park / arc / point line spacing, parallel lines, included angle, two center distance, the two centers of the longest and shortest distance
5. The basic combination of measurement: line pitch, pitch function, the sub-line function, height difference function, the curve rectangular function, the line of intersection, two lines of intersection, two circles of intersection, two midpoints, two draw lines.
6. Reset, clear, match the coordinate system function.
7. Origin setting / workpiece alignment (not limited to the execution time, the number of times).
8. Workpiece / observation coordinates switching (rapid measurement of length, distance).
9 graphics, database reports print.
10. Graphics, database EXCEL export
11. The database can be deleted from multiple groups.
12. Image Area Load / Save Image (Bmp, Jpg).
13. Provide manual and 3-axis joystick control, the workpiece can be programmed to automatically measure and automatically export the report.
14. DXF document generated by the workpiece CAD can be converted to CNC programming, the implementation of automatic measurement.
15. CNC programming can be done by array to improve the programming efficiency.
16. Lens according to CNC programming automatic conversion ratio and auto focus. (Optional)
17. LED light source can be automatically converted according to CNC programming brightness, to avoid measurement errors caused by changes in light.
18. Measurement results can be set up and down control, OK or NG will be displayed in green or red.
19. Comes with SPC can provide CPK value for reference.
20. Can be linked to capture the full picture of the workpiece.
21. Image auto-hugging, to avoid visual error.
22. Part measurement graphical, graphics and images can be archived, and go to DXF file for CAD editing.
23. Automatically generate WORD / EXCEL statements and custom report format, automatically import the measurement results.
24. Measurement data can be automatically imported into customer-generated forms.
25. Provide all kinds of precision parts of the geometric measurement, tolerance calculation, graphical display, measurement data can be archived and exhaled calculations.
Software (AVM2.5D) Description:
1, automatic image search function to avoid visual errors, reduce operational fatigue
2, the image can be archived, print
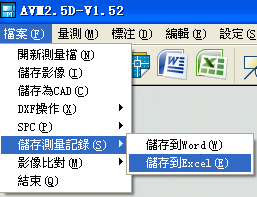 Various archiving tools
3.Super burring function, you can find out the correct point, line, circle, arc position
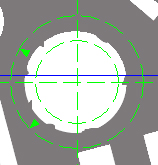
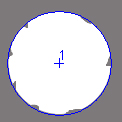
Set the detection area After testing the circle
4.automatic image determination tool, quickly calculate the point, line, circle, arc measurements
5.the basic geometric element measurement functions: point, line, circle, arc, ball, and keyboard input coordinate function, each measurement can be multi-point measurement, measurement results are free to choose whether to print.
6.Measuring graphical functions:
A. Measurement Immediate graphical, you can directly click the icon on the point, line, circle, arc and other elements to measure.
B. Measurement results can go to CAD for editing
C. graphics can zoom in, zoom out, zoom in partly, move,rotate
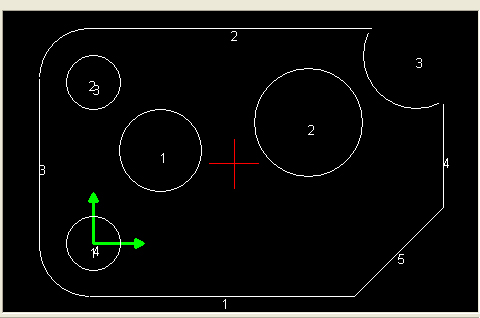 CAD tool window
7, Multi points deviation analysis chart, a variety of bias at a glance
8, Provide "test results report" function
A. Measurement data can be archived
B. Measurement data can be exhaled at any time to observe the calculation
C. Measurement data can be converted to EXCEL, the preparation of test scores report
D. EXCEL macro function applications, providing X-R control chart, you can draw control charts at any time
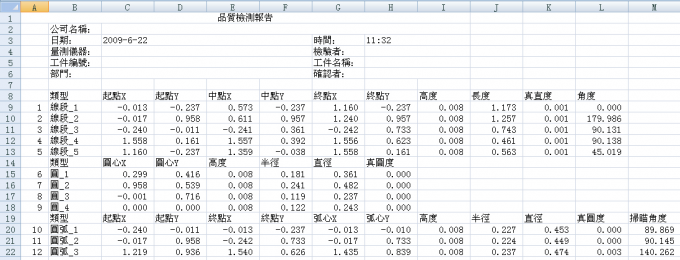
Excel report (data part)
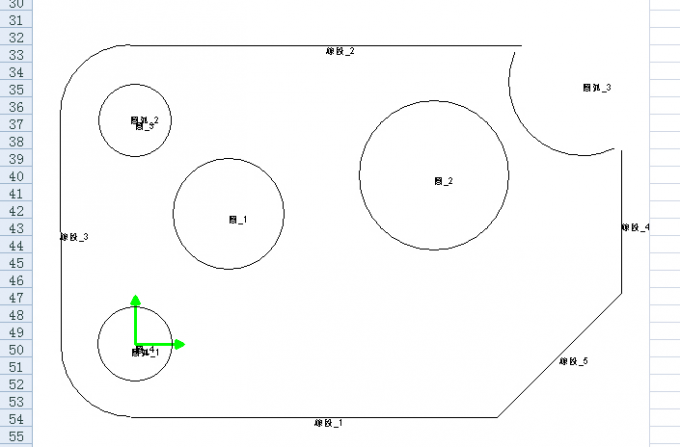
Excel report (graphic part)
9.Chinese and English operating environment can be switched.

10.built-in SPC analysis software: can generate Xbar-R; XBar-S; XBar-MR three control charts.
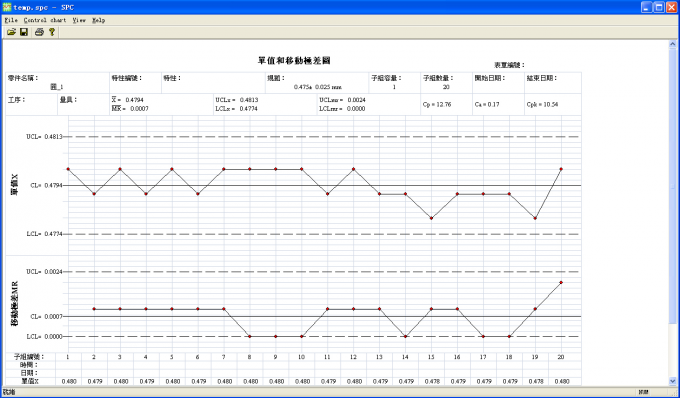
SPC Control Software (XBar-MR Chart)
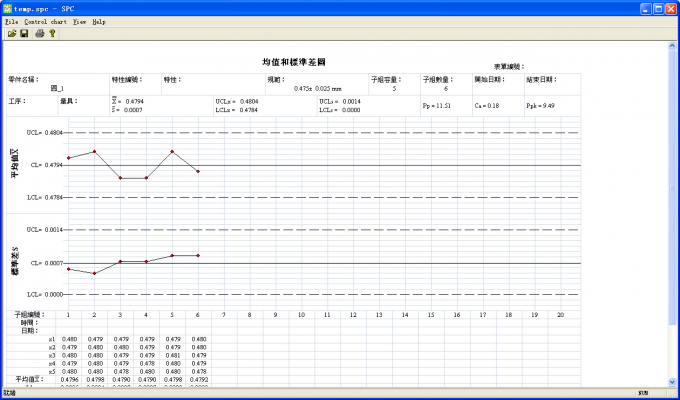
SPC Control Software (XBar-S Charts)
Environmental requirements:
Temperature range: 20 ± 2 ℃,
Temperature change: <0.5 ℃ / h <1C / 24h
Air pressure: 0.6MPa ~ 0.8MPa,
Maximum air consumption: 200L / min (0.45MPa)
Humidity range: 30% -70%
Power: 220V ± 5%, 50Hz
Maximum power: 1 KW
Ground vibration: vibration frequency ≤ 10 Hz amplitude ≤ 0.5μm
Note:
1) The location must be far away from the vibration source, avoid placing above the second floor, to avoid the impact of vibration accuracy.
2). Avoid direct sunlight, compartment insulation as far as possible using the RC structure
3). Avoid air outlet of air conditioner directly blowing to the machine.It would be better to have automatic temperature control system.


Reviews
There are no reviews yet.